BLog no 5 December 2013

Indicators on XKs and Other Old Cars
Relays and self canceling units
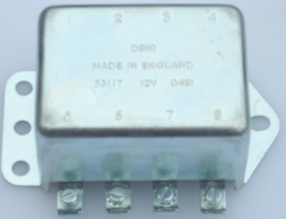
Over the last month I have spent a great of time researching the topic of indicators on XKs although some of the work could be relevant to other makes and models. All XKs were originally equipped with a Lucas double relay box (DB10) that allowed brake lights to double as indicators. All XKs that is, except home market ‘120 roadsters, which weren’t equipped with any indictors at all. I noticed that the neat DB10 box is now reproduced but costs around £100 so I set about making one. It cost me around £30. Using four Bosch Single Pole Dual Throw (SPDT) relays and a Maplin plastic enclosure box. My offering is twice the size of the Lucas item but it should fit on a bulkhead. I have circuit diagrams for the wiring needed to install a DB10 and my home made equivalent, get in touch if you need them.
The next problem on UK ‘120 OTS cars is the provision of an appropriate switch. Fixed and drop head cars have a self-canceling switch in the centre of the steering wheel. Unfortunately, if you don’t have one fitted they cost north of £400 are very fiddly to fit and the wires must be threaded though the steering column and out through the steering box. Not a job for the faint hearted.
Luckily, my pal John Smith, at Abtek Controls has the solution. He provides two very clever electronic boxes, one that incorporates a settable, automatic canceling circuit (CF3) and another that also incorporates a flasher unit (CF2). The CF3 can be used on circuits with DB10s and traditional flasher canisters as well on systems where flashing indicators and semaphores are required to work together. The CF2 obviates the need for a DB10 and separate flasher

Home made DB10 equivalent
Reproduction Lucas DB10
XK 120 Rear Amber Flashers
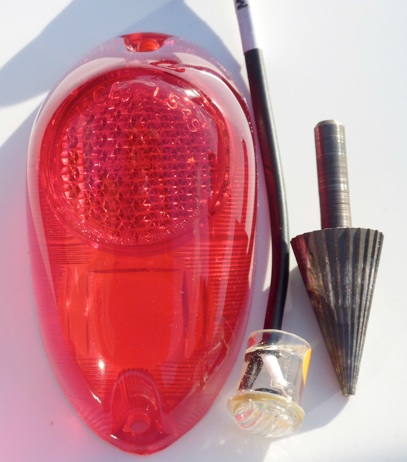
One of the problems of fitting indicators on XKs using the factory solution (DB10) is that that fronts flash white and rears red. These days other road users are expecting amber. However, many owners of historic vehicles are reluctant to hang on after market flashing lights so I turned my attention to incorporating amber lights into standard fittings. I have to say that I got my inspiration from my good friends Rod Shears and Bob Exelby, both XK gurus of outstanding talent. The rears on ‘120s use a double filament white bulb and a red Lucas L488 lens. I acquired 24 light amber LED strings which I was able to cut with an ordinary pair of kitchen scissors to give me 10cm, 12 light, strings that fitted perfectly around the inside of the glass. Although the original glasses are red, it is possible to buy clear ones (Stafford Vehicle Components SVC). By using a red bulb and a clear lens with the amber LED string, a satisfactory result can be achieved. If you are using a DB10, the amber string should be connected to the front indicator lights (DB10 terminals 2 and 6) If you don’t want the rears also to wink red, disconnect terminals 3 and 7 and reconnect them to terminal 5.
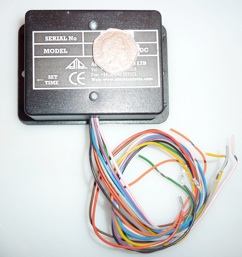
Abtek CF3, the CF2 looks the same
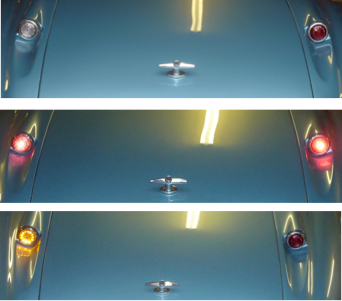
Top: My XK 120 that has the standard L488s showing the contrast between the clear and red lenses. Middle: tails lights with both lens, Bottom: LED flasher.
The normal practice on ‘120s is to use double filament front bulbs in the sidelights. This normally gives white flashers. I have however found a useful double filament LED bulb where one filament gives a white light and the other amber (http://stores.ebay.com/GT-Autohause). Unfortunately these bulbs are negative earth only and can’t be used on positive earth cars. If you are positive earth, then SVC offer a kit that provides a set up with two incandescent bulbs that fit a later type XK sidelight. One bulb is amber and the other white. They are intended for fitment in Lucas 1130 sidelights so not a trivial fit in XKs. It requires considerable surgery to both the XK and SVC parts to produce a working solution but it can be done.
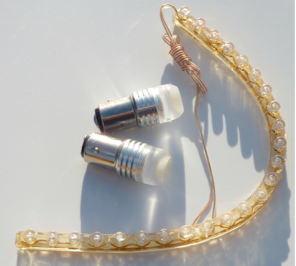
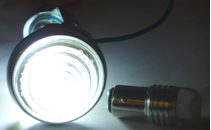
The 24 bulb flasher LED string that can be cut down and double LED filament bulbs.

XK light units fitted with double filament LED bulbs.
XK140/’150 Amber Rears
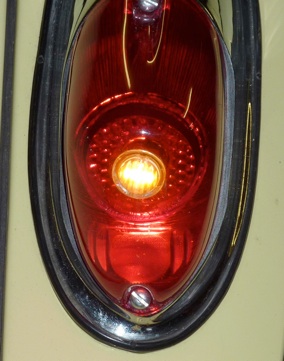
On XK140s and early ‘150s the rears flash red but, as far as I see, no clear rear lens is available. I acquired a pair of 18 mm bright orange LEDs intended as side flashers on kit cars (eBay from Bolt-on-Bits in Birkenshaw - product code M0414.) By drilling a 16 mm hole in the plastic lens the sealed LED unit can be inserted and super-glued in place. The lights come with rubber grommets that can be discarded. Be very careful when drilling out the red plastic lens, it’s very easy to crack and destroy them. There is a hollow section between the outer case and the internal reflector and the outer plastic is particularly thin and brittle. After destroying my first lens I took it very carefully, starting with a relatively tiny hole I then used a cutting cone slowly to get the hole the right size. Should it go pear shaped, SNG Barratt supply lens for a fiver each. The inserted LEDs should be wired up to the front indicator DB10 terminals 2 and 6. I’d like the LEDs to be a bit bigger so I would leave the reds to flash as well. The amber centre should get the intention of the cars behind.
The ‘140/‘150 rear lens, the kit car LED repeater and the drill tool used to make the 16mm hole in the lens.
This not a good shot of the imbedded LED light in the rear light of an XK 140.
Polarity
It’s worth noting that all LEDs seem to be negative earth. Bulb and strings have inbuilt control circuits which means they won’t blow if connected the wrong way, they just won’t light. If your LED device is connected into your circuit by wires, you can ensure that it’s connected the right way but with bayonet fittings that rely on earthing through the chassis, you are either negative earth or they won’t work.
In order to make sure the modifications work correctly, I have used my own cars as guinea pigs and have also created a test rig to try out the ideas. If you want more information or need help contact me. I have circuit diagrams for just about all the set-ups discussed.
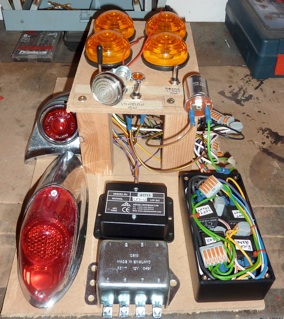
The bench based test rig I have used to test out some of the ideas in this blog.